|
WARNING THIS IS AN ALPHA RELEASE, SO BUGS WILL OCCUR. DO EXTENSIVE TESTS AND REPORT BUGS !
As soon as I drafted out the initial concept of sIBLstage, it was clear that this to work out efficently it would need a set of profiled
l ights.
The choice upgrading the old lightsmithedit to harvest the system was a non brainer. Not only would it shave off some
development time, but it also would be an ideal enhancement for a general purpose library of profiled lights in the cg realm.
(Having spectral information is currently an overkill, but in future if spectral rendering becomes widespread, having a library
of profiled lights might be beneficiary.
The system is based on the old sIBL/lightsmith format developed by
Christian Bauer, Christian Bloch, Volker Heisterberg, Thomas Mansencal and Gwynne Reddick
which
at that time offered a one click solution for image based lighting. (Although a lot of the things have become outdated) This might, or might not bring some new live to the format or change it completely during the course of its development, or which is also very likely vanish again from the tainted surface of the world
I changed the name to sIBLlight (but still keeping the lightsmith names in the file format) for two reasons. First it really has to become part of the sIBLfamily, not only by name, but also in functionality
(meaning all future version should have that extended amout of information as a standard light definition). But again all is subject to change
NEEDED HARDWARE
For full usage of the program you need a FTDIchip based USB to DMX controller. This are very affordable and availeable in most
online shops. An artnet based system is in the plans, if there is enough commercial interest in this system
Second it is recommended to invest in a HDMI to USB dongle, which does output a webcam feed which sIBLstage and sIBLlight
need for profiling lights whitepoint based on the camera feed, or as a helper to position lights based on a mirror ball
THATS ALSO THE REASON BOTH PROGRAMS ASK FOR WEBCAM ACCESS
sIBLlight is free
Unlike sIBLstage I don’t see a reason to finance such an open system. Besides the concept is based on other peoples free work.
And the usual disclaimer, I provide the software as is. Use it at your own risc. Im not reliable for any data loss, financial loss, or any miisuse of the program. Especially in its alpha phase


Documentation also in the zip file
Sorry for the big wall of text now following, but this is a rather complex program and concept So sorry about that
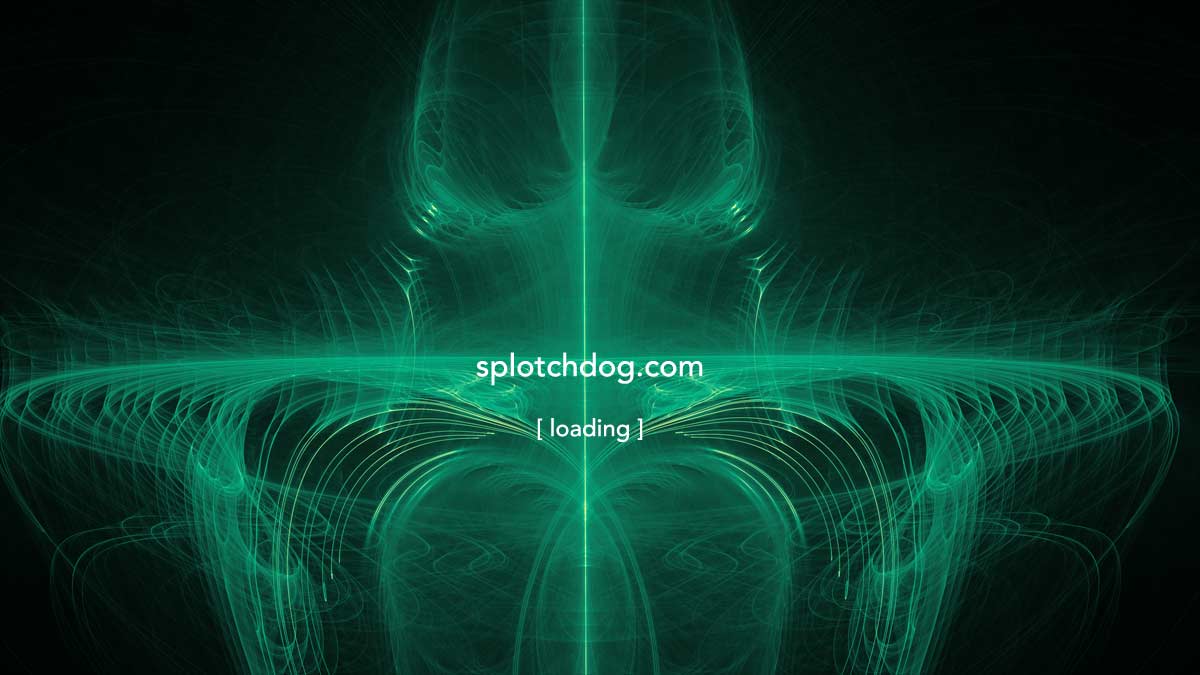
The Config Panel
Upon first launch you are asked to define a directory where your sIBLlights are located. You need at least one directory so the
program does work.
 |
The plugin directory is a leftover from sIBLedit
while the interface color editing should work it has not been tested. |
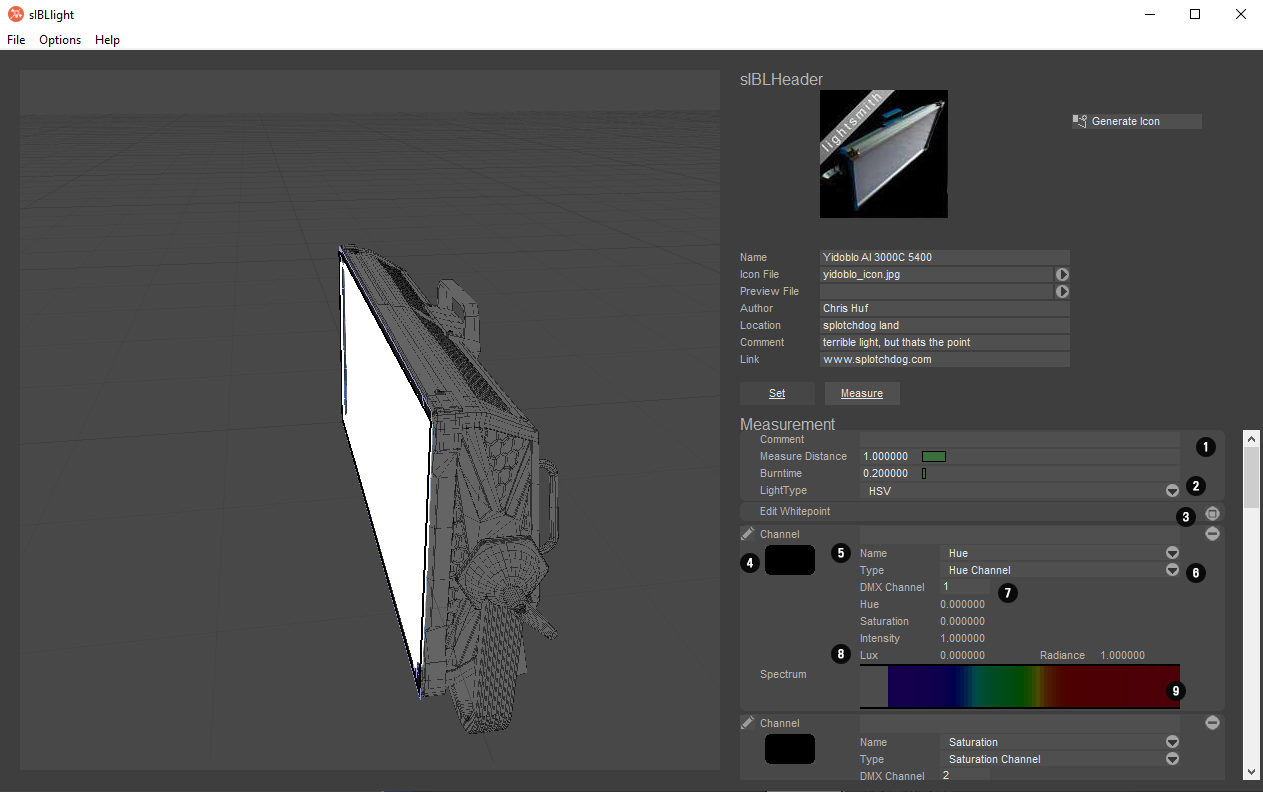
The main panel lightsmith standard view

 |
Main View
Main 3D view, where you can inspect your sIBLfile |
 |
sIBL Header definitions
These are the standard sIBL header definitions (New for old sIBL users: The preview file selector has been added) |
 |
Switch between standard lightsmith defintion and measured values
This is new. Most of the additional sIBL extensions can be found under the measure tab. |
 |
Standard Lightsmith defintions
These will be outlined later in the document, and are mainly for 3D usage.
New for existing LS users is the kelvin tag which allows you to store the kelvin you you shot the hdri for the lightsmith |
 |
Auto Generate Values
For quickly setting up a Lightsmith file.
Can be placeholders for further editing in other applications |
 |
DMX Base / DMX Offset
The default / first DMX Channel of the used light.
Offset is still not used, but the idea is that sIBLstage reserves that amount of channels before it adds another light with
consecutive channel values. |
As for now all other (old) functions are described in the pdf at the end of the document
The main panel lightsmith measure tab
|
Measurement Header
Comment: Might hold any information about the measurement like device, date of measurement etc.
Measurement Distance is the distance between the light and the measurement device.
Burntime is the time the light was on before measurement in minutes |
|
Light Type
Not used yet. But plan is to offer this information to the browser for clarity |
|
Edit Whitepoint
Hitting the Plus Button will allow you to setup whitepoints for your lights.
Or in other words, the color the light saturates to
sIBLstage needs at least one whitepoint to work properly
|
|
Edit / Color Button
Pressing one of those will open the Calibration Dialog, where you can set all parameters of each channel |
|
Name
The channel name, like red blue green, hue, kelvin etc. You can use a custom name, or choose from one of the presets |
|
Channel Type
To define this correctly is a must. Here you define what type of DMX channel to work with.
Kelvin is for mono / bicolor lights
Color Channel is for RGB controlled lights
Hue, Saturation, Intensity Channel is for HSV controlled lights
Control is for additional behaviour control channels of your light |
 |
DMX Channel
This is the channel which is added to the base. Lets say your base address is 24, the first channel will be 0 the next 1 etc,
Channels do not have to be in order.
IF A CHANNEL IS SET TO A NEGATIVE VALUE, IT WILL BE IGNORED IN sIBLSTAGE.
This is important if you want to profile your light beyond DMX usage:
A HSV controlled light might still have measurement of the red/green/blue channels for different usage,
You can do it by simply by simply assign them any number below 0 |
 |
Lux / Radiance
Despite using radiance values to store in the sIBL file. The measured lux value is also kept, for future improvment |
 |
Spectrum Display
If a channel contains spectral data, these will be displayed here |
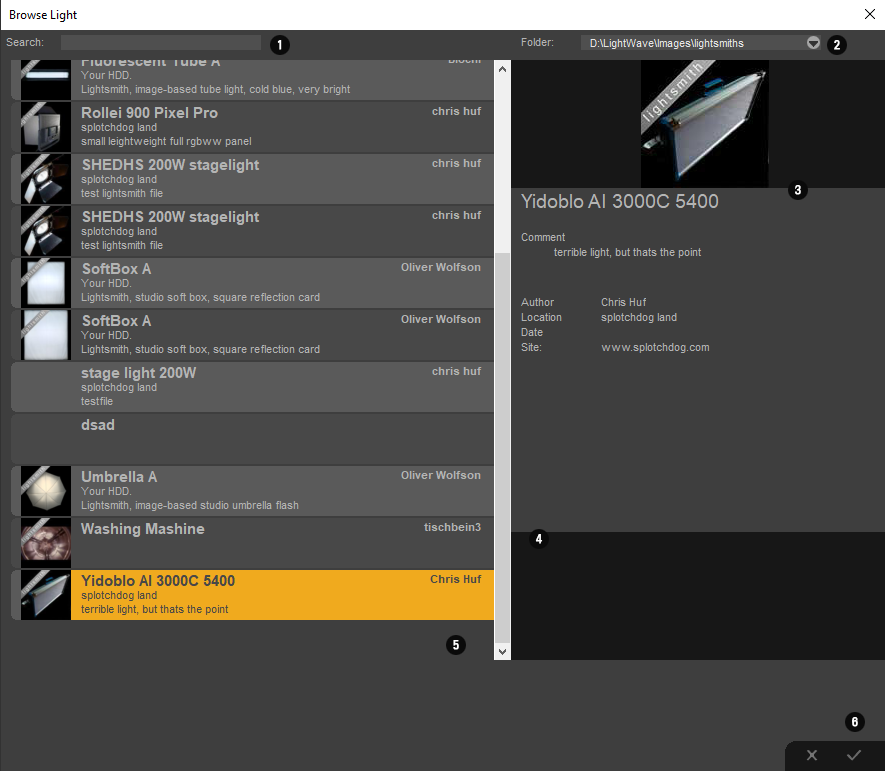
The light browser.
Currently the browser is not implented, but due to its modular nature its quite easy to implment and will be added
in one of the next alpha versions
|
Search let you search for a light |
|
Folder preset selection
If you added multiple folders in the config menu, you can quickly swith between them |
|
Main Information
Here you can see some of the information provided by the sIBL file |
|
Additional files
If there are other images assigned to the sIBL file (like a preview) these will be diplayed here |
|
Main View
Select a light. in the view, to display details / import |
|
Ok / Cancel
Here you can decide if you either want to import a light or cancel the operation |
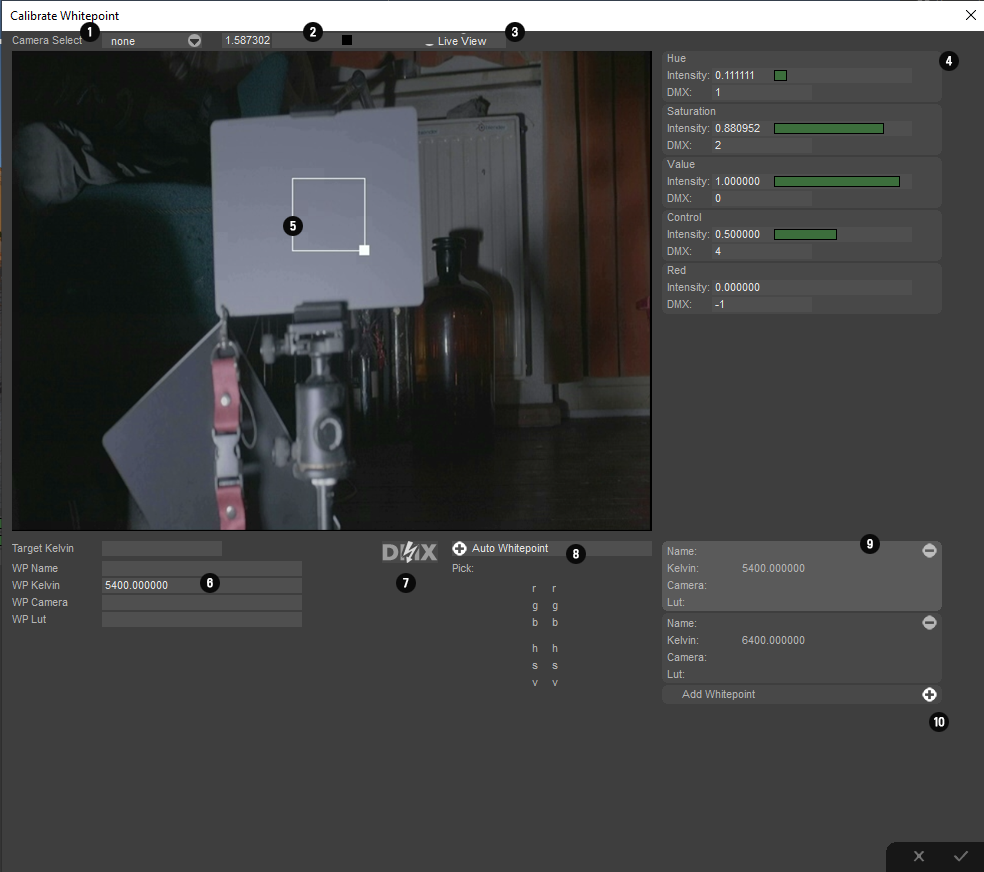
The Whitepoint Dialog
sIBLstage "overwrites" the internal color engine of your light. Or at least it tries to. This means you need to have at least one
whitepoint in your light defintion for the program to work. THis CAN be the intended whitepoint of your light, or a self defined one.
The benefits is, that you can correlate the light to the cameras whitepoint without the need of a spectrometer and hoping that
5200 kelvin of your light correlates to the 5200 kelvin of your camera. This is archiveed by filming a grey reference object
illuminated by the light, and the values are tweaked until the saturation is almost 0
The tool uses the webcam input feed, which most of the hdmi to usb converters uses. For that reason you have to grant
sIBLstage and sIBLlight access to the webcam.
|
|
Camera Select
Select the camera (which should be recognized as a webcam in windows) which you want to use |
|
Exposure
Sets the exposure of the cam input if supported |
|
Live View
Turns on Live View |
|
DMX Controls
Once you add a whitepoint you can control how much of each availeable channel adds to the whitepoiint. Eg just the white LED, or
add a bit of green and red, to compensate for that blue/magenta tint of that cheap LED lights. |
|
Main View
Here you can define the area which is used for evaluating the color. This has to be neutral grey and should not clip |
|
WhitePoint declarations
Here you should at least enter the WP kelvin value, the rest is for your own personal preference. (If you got multiple cameras
you want to calibrate to, or different luts applied to that camera) |
|
DMX On/ Off
Turns dmx on or off. Please be aware that the dialog use the dmx settings you entered in your main program |
|
Auto Whitepoint
Currently unsupported. |
|
RGB/HSV readout
Displays the average value of the measured patch in your liveview. Basically you try to lower the s in the
hue saturation value section to 0 as close as possible |
 |
Whitepoint List
Here you can add whitepoint defintions, by hitting the plus button. You can use this to select different whitepoints
you have already defined. |
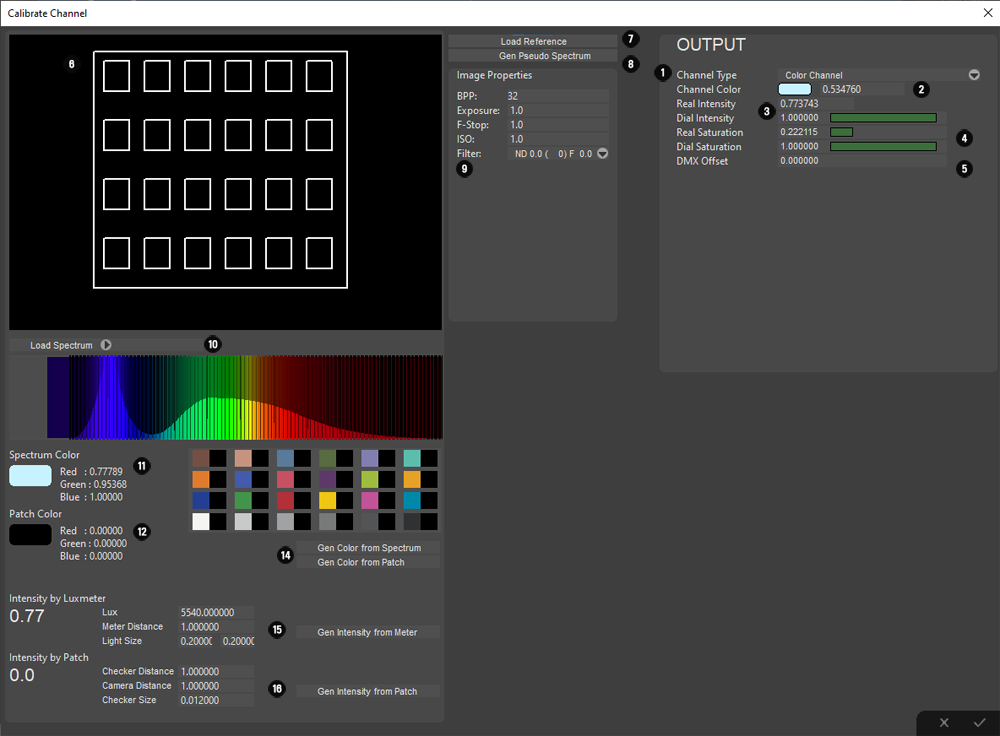
The Calibration Panel
Here you can edit the type and outpout of each channel.
This panel might be overwhelming at first, but whats important are the few values on the right under OUTPOUT
Most of the values on the left are for evaluating / measuring lights on basis of a spectrometer or a photo of a xrite color
checker illuminated by the light. (As for the later it is experimental and subject to changes)
A lot of the settings are provided so you don't have to reprofile a light if some additional functionality will be added in future.
There is a lot of work to be done in this panel.
|
|
Channel Type
You have the option between Kelvin for Mono/Bicolor Lights, Color Channel for RGBW etc lights. Hue Saturation and intensity channels
for HSV controlled lights and Control Channels, for Channels which controls the behaviour of a light |
|
Channel Color
This will be the color the light. Essential for COlor and Kelvin channels. |
|
Real Intensity / Dial Intensity
Real intensity is the measured value, while Dial is what intensity you dialed in the light. Currently I do not support multi dial defintions, so
keep the DIAlL value at one |
|
Real Saturation / Dial Saturation
Same as for real / dial intensity. It is recommended to keep these values untouched. Real saturation is used by the color engine to
exclude channels which do not have color information, like white led, for color calculation, |
|
DMX Offset
Default offset. This is eesential for control channels. (Like my of my lights which needs a default value of 0.5 to be in hsv mode) |
|
Photo view
Displays the photo loaded. You can adjust the corner handles to match the xrrite color checker |
|
Load Reference
Loads an image to be displayed in 6. This is for the calibration by photo method, and is highly experimental. |
|
Gen Pseudo Spectrum
Generates a pseudo spectrum on basis of the illumination of the loaded image. Does not work properly and is subject to change
so for now keep your images for future evaluation (you can put them in your sIBL folder) |
|
Image Settings
Loaded automaticallly by exif data, or can be edited. These are used for the intensty calculation |
|
Spectrum / Spectrum Import
Dsiplays the spectrum of the chanel, You can also import a spectra. It currently support csv files from Sectragryp, Theremino
and from US Langzage based Sekonics (If the reference file I found is valid) and bmp images from lower level Sekonics.
If you encounter problems, just send a file to me. The Spectrum is stored in the sIBLfile for future usage |
 |
Spectrum Color
The color evaluated by the spectrum, subject to change to support other whitepoints |
 |
Patch Color
The evaluated color of the patch. Very simple for now subject to change |
 |
To be added in future |
 |
Gen Color by Spectrum / Patch
Sets the designated value to the output value. |
 |
Intensity by Luxmeter:
Tries to get radiance values from the measured Luxmeter values. Light size is the same as the light size you provide in the main panel.
Meter Distance is the distance between the luxmeter and the light. This will be stored in the sIBLfile for future enhancements |
 |
Intensity by Patch
Camera Distance is the distance from the camera to the color checker. Checker Distance is the distance from the light to the checker.
And checker size is the actual size of the checker. |
|