|
WARNING THIS IS AN ALPHA RELEASE, SO BUGS WILL OCCUR. DO EXTENSIVE TESTS AND REPORT BUGS !
sIBLstage is a program which let you control DMX lights on basis of an hdri/ldr envrionment image.
The idea behind it is, that you can light,
or augment your lighting of your greenscreen / LED background / LED volume with additional lights.,
or just in regular photo/videography to reastablish or use a specific lighting preset.
Since Im only on limited ressources I can only check a certain amount of the features. (Another reason I do release the alpha=
BTW, there is also another program by another company in development, which is similar, but differs in some essential workflows than I do.
Take a look at cybergaffer.com for more information. I think both methods have their pro and cons...(you should have heard me cursing
when I rearanged the lights in my small space)
Here is a quick funtionality test: I should have took more care on the exposure of the footage, and in some of the examples, especially
the outdoor scenesm I overdid the saturation which I should have left at the defaults
This is the first public release of sIBLstage (for controlling lights) and sIBLlight (for profiling lights). If the concept
can be actually executed,
has to be proven in the coming months
. By me and all who want to give me further input on this. Either by mail or in the forum thread
The system is based on the old sIBL/lightsmith format developed by
Christian Bauer, Christian Bloch, Volker Heisterberg, Thomas Mansencal and Gwynne Reddick
The choice to revive this format was done for several reasons, mostly because it provided a lot of the needed properties and second because development
on that regard might be profitable for a modern version of the file format, if anyone wants to work again on its development.
NEEDED HARDWARE
For full usage of the program you need a FTDIchip based USB to DMX controller. These are very affordeable and availeable in most
online shops. An artnet based system is planed, if there is enough commercial interest in such a system
Second piece of equipment I do recommended to invest in a HDMI to USB dongle, which does output a webcam feed which sIBLstage and sIBLlight
need for profiling lights based on the camera feed, or as a helper to position lights based on a mirror bal
l
THATS ALSO THE REASON BOTH PROGRAMS ASK FOR WEBCAM ACCESS
Commercial vs Uncommercial
Uncommercial is for checking the functionality of the program, and garage filmakers. The only difference functionality wise is, that the uncommercial has a watermark in the main view, thats it.
Based on the sales of the commercial
sIBLstage, I plan further time, money and energy investment on the program. For me this was an interesting experiment and
programming exercise, and is almost at a stage I would use it regulary on my home setup. But a lot of the more advanced stuff
would need significant investment I can not do without compensation.
sIBLlight, the program to profile lights can be found here for free.
If you want some insights on the development I recommend this article_hdriandstagelight, and if you are extra hardcore you might also checkout the long forum thread on the development
And the usual disclaimer, I provide the software as is. Use it at your own risc. Im not reliable for any data loss, financial loss, or any miisuse of the program. Especially in its alpha phase


Preliminary Documentation (Must read...pdf in download)
Sorry for the big wall of text now following, but this is a rather complex program and concept So sorry about that
The Config Panel
Upon first launch you are asked to define a directory where your sIBLlights are located. You need at least one directory so the
program does work.
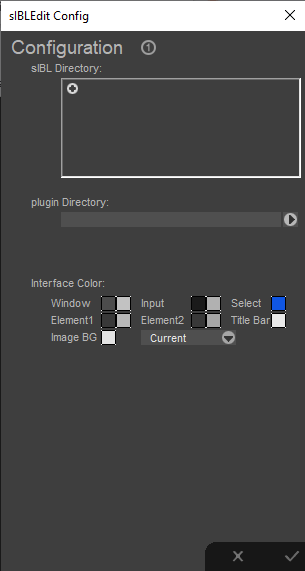 |
The plugin directory is a leftover from sIBLedit
while the interface color editing should work it has not been tested. |
The main panel

 |
Main Menu |
 |
Image Bar
Displays the loaded image. Option to remove images will be added |
 |
Main View
Here you can display the image, the lights and the north shift (eg the direction the camera is looking to)
Alt Clicking on a light will select the light for mouse movement |
 |
Display Controls
Changes how the environment is displayed (does not affect the lights) and the north shift |
 |
Pick Method
Either Point, which only uses the pixel value where the light is positioned or
Area, where the whole area the light covers is evaluated |
 |
Pano Height
The height the panorama origin / where subject is placed. This will be used to calculate the light height |
 |
Auto Light
Uses several median cut algorithm to automatically place the lights on the panorama. This istill subject to change. |
 |
MB pos
Opens the mirror ball position method. will be explained in detail below |
 |
Light Radar
Gives you an top down view of the lights angle/position. This is affected by the north shift. This gives you a
visual hint where to place the lights. |
 |
Browse Light
Opens the sIBLbrowser for quickly adding a profiled light. A more detailed description of the browser can be found
below |
 |
Add Light
This allows you to quickly add a non profiled light. A more detailed description can be found below |
 |
Bluetooth Connection
Option to enable bluetooth connecttion to a phone, pretty useless without an app I might write.
(Not sure about thatz) |
 |
DMX On/Off
Activates / deactivates DMX |
 |
Light Canvas
Main panel for editing lights. Will be explained in detail in the next section |
 |
Global Light Controls
Affects the Output of all lights simultanesly |
The Channel Panel
This is the main interface for controlling each individual lights.
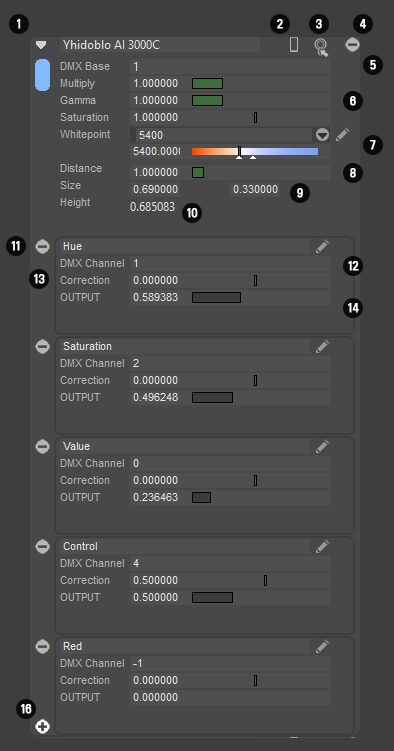 |
The name bar, Here you can minimize a light panel, and give
your light a name
Bluetooth Control: Currently not supported
Light Positioning: Selects the light to be positioned on the main panel
Deletes the light
DMX Base. The first channel the light uses. All other channel assignments
are added to this value. So if you got red on 8, blue on 9 etc. The base is 8
and red will beome 0
Color correction for each light. Allows you to adjust the intensity / gamma
and saturation of each light
Whitepoint Settings This allows you to select a predifined whitepoint in the
popup, interpolate between different whitepoints using the slider and let you
edit/add whitepoints in the whitepoint channel by cikicking the pencil button
PLEASE BE AWARE THAT SIBLSTAGE NEEDS AT LEAST ONE WHITEPOINT
FOR EACH LIGHT TO WORK CORRECTLY
Distance: The distance from subject to light. This currently affect the size of
the light in the main view, and will affect the lights intensity sometimes in future
Size: The general size of the light. This affects the size of the light in the mai
panel.
Height: Outputs the calculated height of the light. This takes ito account the
position on the panorama and the general panorama height.
For each channel you got:
The name of the channel, the minus sign deletes a channel and the pencil
button lets you edit a channel.
The dmx assignment for each channel This is added to the base channel.
If a channel is below 0 it is not evaluated during color calculation
(LIke Control channels or additional measured channels)
Correction: Here you can manually add or substract individual values on a
per channel basis for finetune adjustments,
OUTPUT: The output value which is send to the light. I'm still undecided if I
want the 8 bit value or the DMX value. Both have advantages
Add a Channel: As the name implies, add a channel
|
Adding a light
There two ways you can add a light, either by selecting a profiled light through the browser, or a more rudimentary but faster way, using the add light functionality
Please be aware that the second might need further editing, and the first is still the best method. For profiling a light use sIBLlight.
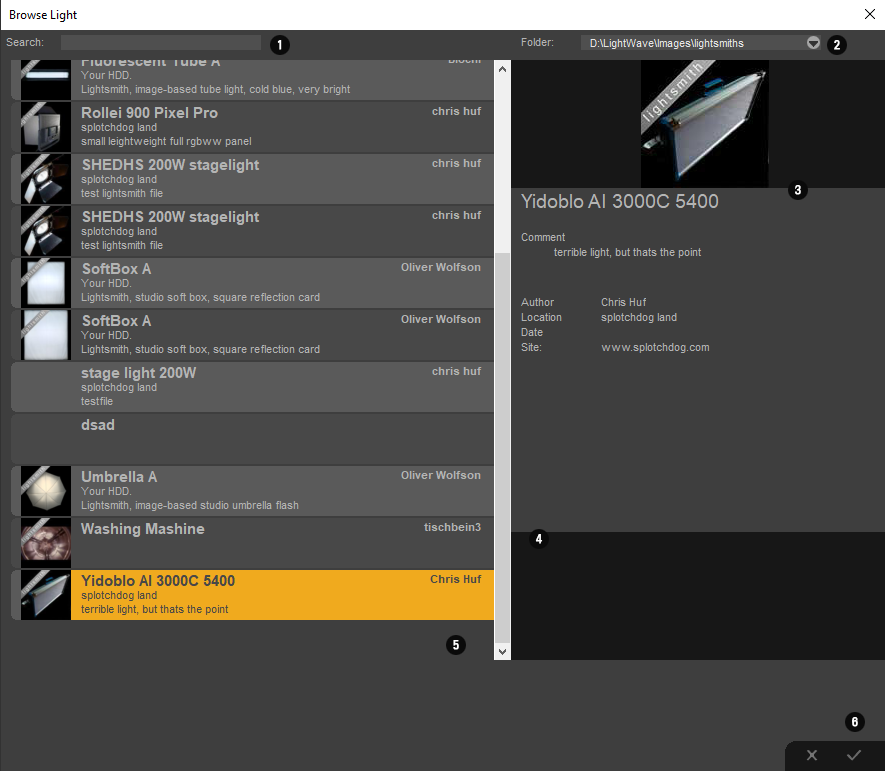
The light browser.
|
Search let you search for a light |
|
Folder preset selection
If you added multiple folders in the config menu, you can quickly swith between them |
|
Main Information
Here you can see some of the information provided by the sIBL file |
|
Additional files
If there are other images assigned to the sIBL file (like a preview) these will be diplayed here |
|
Main View
Select a light. in the view, to display details and import |
|
Ok / Cancel
Here you can decide if you either want to import a light or cancel the operation |
The Add Light Dialog
This method has been added, when you don't have the time to completely profile a light, and just want to
get results fast.
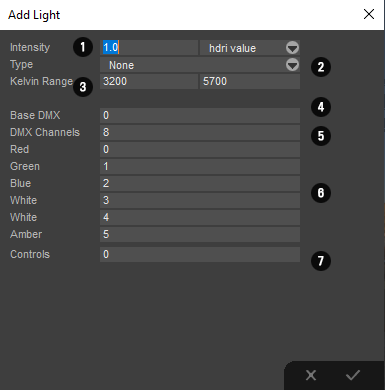 |
Intensity: You can either enter the intensity of the light
By radiance/ watt / lux or cd. sIBLstage has a rudimentary, made up,
method to correlate these values. Lights with multiple channels will split
the value between each channel evenly
Type:
A few presets for different lights to add. Might make this configzrable in
future
Kelvin Range:
For mono colored lights it only display one kelvin, for bicolor enter the range
the light uts capable to display
Base DMX is again the base DMX address the light reacts to
DMX Channels
The amount of DMX channels the program should add
The Channels the Program will add to the light canvas. These can be
edited here, or afterwards in the main panel
Controls:
How many control channels the Panel should add. |
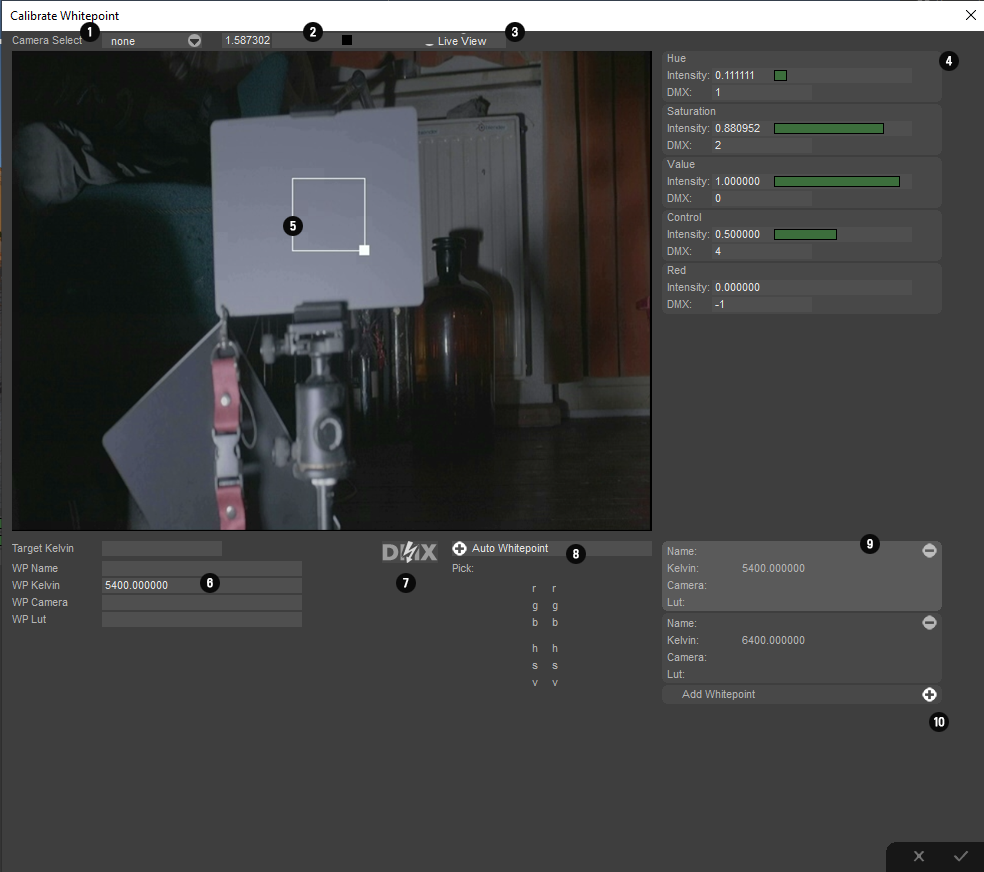
The Whitepoint Dialog
sIBLstage "overwrites" the internal color engine of your light. Or at least it tries to. This means you need to have at least one
whitepoint in your light defintion for the program to work. THis CAN be the intended whitepoint of your light, or a self defined one.
The benefits is, that you can correlate the light to the cameras whitepoint without the need of a spectrometer and hoping that
5200 kelvin of your light correlates to the 5200 kelvin of your camera. This is archiveed by filming a grey reference object
illuminated by the light, and the values are tweaked until the saturation is almost 0
The tool uses the webcam input feed, which most of the hdmi to usb converters uses. For that reason you have to grant
sIBLstage and sIBLlight access to the webcam.
|
|
Camera Select
Select the camera (which should be recognized as a webcam in windows) which you want to use |
|
Exposure
Sets the exposure of the cam input if supported |
|
Live View
Turns on Live View |
|
DMX Controls
Once you add a whitepoint you can control how much of each availeable channel adds to the whitepoiint. Eg just the white LED, or
add a bit of green and red, to compensate for that blue/magenta tint of that cheap LED lights. |
|
Main View
Here you can define the area which is used for evaluating the color. This has to be neutral grey and should not clip |
|
WhitePoint declarations
Here you should at least enter the WP kelvin value, the rest is for your own personal preference. (If you got multiple cameras
you want to calibrate to, or different luts applied to that camera) |
|
DMX On/ Off
Turns dmx on or off. Please be aware that the dialog use the dmx settings you entered in your main program |
|
Auto Whitepoint
Currently unsupported. |
|
RGB/HSV readout
Displays the average value of the measured patch in your liveview. Basically you try to lower the s in the
hue saturation value section to 0 as close as possible |
|
Whitepoint List
Here you can add whitepoint defintions, by hitting the plus button. You can use this to select different whitepoints
you have already defined. |
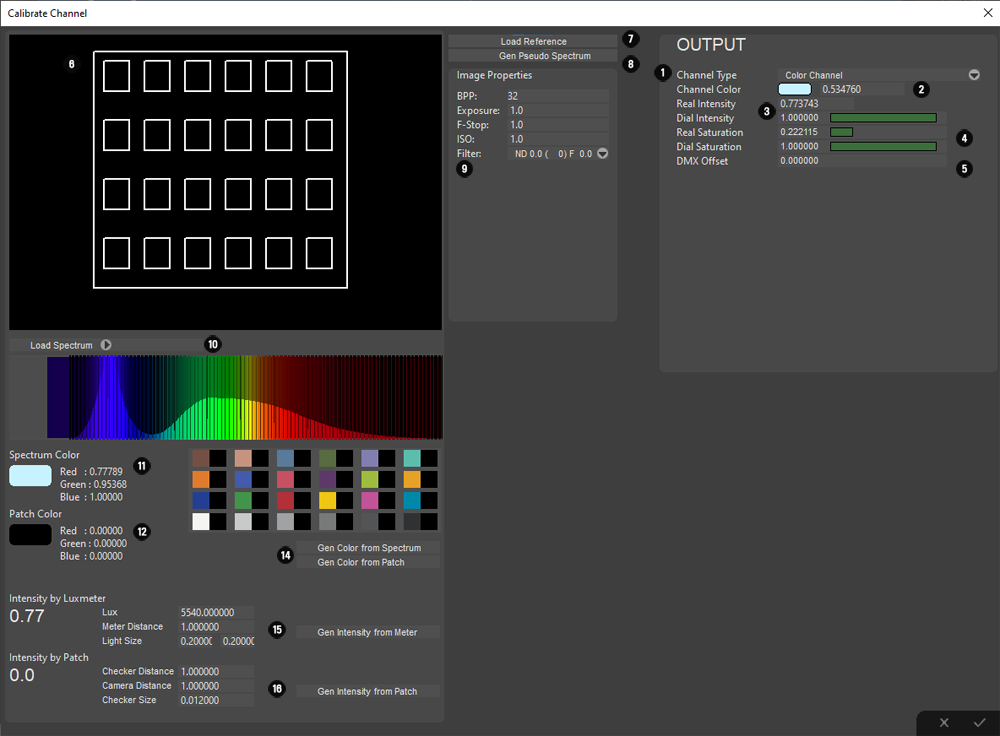
The Calibration Panel
Here you can edit the type and outpout of each channel.
This panel might be overwhelming at first, but whats important are the few values on the right under OUTPOUT
Most of the values on the left are for evaluating / measuring lights on basis of a spectrometer or a photo of a xrite color
checker illuminated by the light. (As for the later it is experimental and subject to changes)
A lot of the settings are provided so you don't have to reprofile a light if some additional functionality will be added in future.
There is a lot of work to be done in this panel.
|
|
Channel Type
You have the option between Kelvin for Mono/Bicolor Lights, Color Channel for RGBW etc lights. Hue Saturation and intensity channels
for HSV controlled lights and Control Channels, for Channels which controls the behaviour of a light |
|
Channel Color
This will be the color the light. Essential for COlor and Kelvin channels. |
|
Real Intensity / Dial Intensity
Real intensity is the measured value, while Dial is what intensity you dialed in the light. Currently I do not support multi dial defintions, so
keep the DIAlL value at one |
|
Real Saturation / Dial Saturation
Same as for real / dial intensity. It is recommended to keep these values untouched. Real saturation is used by the color engine to
exclude channels which do not have color information, like white led, for color calculation, |
|
DMX Offset
Default offset. This is eesential for control channels. (Like my of my lights which needs a default value of 0.5 to be in hsv mode) |
|
Photo view
Displays the photo loaded. You can adjust the corner handles to match the xrrite color checker |
|
Load Reference
Loads an image to be displayed in 6. This is for the calibration by photo method, and is highly experimental. |
|
Gen Pseudo Spectrum
Generates a pseudo spectrum on basis of the illumination of the loaded image. Does not work properly and is subject to change
so for now keep your images for future evaluation (you can put them in your sIBL folder) |
|
Image Settings
Loaded automaticallly by exif data, or can be edited. These are used for the intensty calculation |
|
Spectrum / Spectrum Import
Dsiplays the spectrum of the chanel, You can also import a spectra. It currently support csv files from Sectragryp, Theremino
and from US Langzage based Sekonics (If the reference file I found is valid) and bmp images from lower level Sekonics.
If you encounter problems, just send a file to me. The Spectrum is stored in the sIBLfile for future usage |
|
Spectrum Color
The color evaluated by the spectrum, subject to change to support other whitepoints |
|
Patch Color
The evaluated color of the patch. Very simple for now subject to change |
|
To be added in future |
|
Gen Color by Spectrum / Patch
Sets the designated value to the output value. |
|
Intensity by Luxmeter:
Tries to get radiance values from the measured Luxmeter values. Light size is the same as the light size you provide in the main panel.
Meter Distance is the distance between the luxmeter and the light. This will be stored in the sIBLfile for future enhancements |
 |
Intensity by Patch
Camera Distance is the distance from the camera to the color checker. Checker Distance is the distance from the light to the checker.
And checker size is the actual size of the checker. |
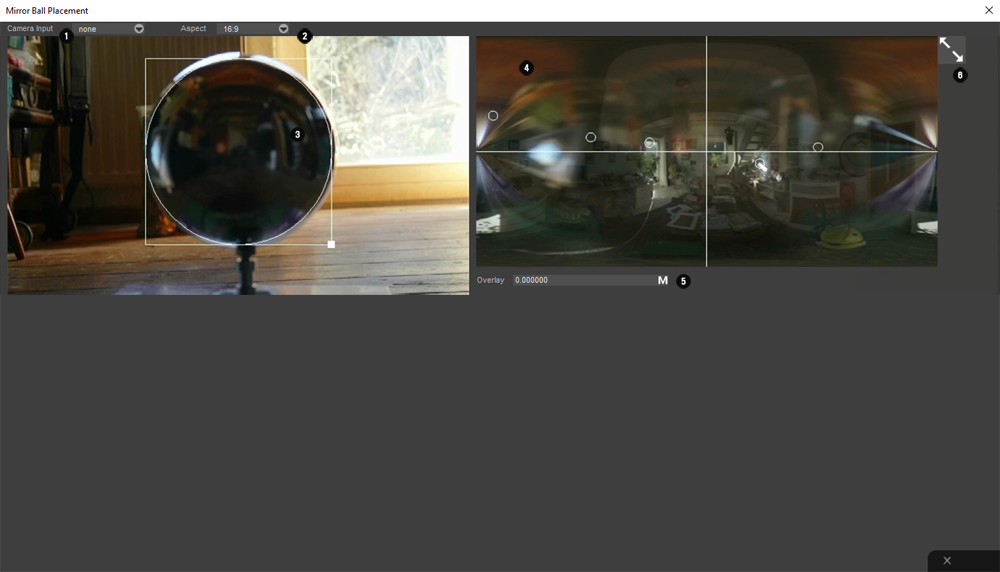
The Mirror Ball alignment
Not testet throughly, and is a different method to align the real lights with the environment. You film a mirror ball, and place the lights according
to their environment position.
|
|
Camera Select
Select the webcam input you want to use |
|
Aspect
Set the aspect ratio of your camera |
|
Main View
Align the outline with the mirror ball, the mre accurate you are, the better the result |
|
Environment view
Unlike the main view, the panorma is shifted so north is allways in the center of the image. It overlays the lights with small
circles and overlays in the panorama |
|
Environment blending
Defines the amount and type how the environment is blended. Either by mixing or adding it. |
|
Full View
Expands the view of the environment view. |
|