|

Usually I don't make product reviews, and when I do, its for not that common stuff or usage scenarios I discovered.
This is a bit different since its a brand new shiny product, and there are not that much other reviews for this product out there.
I bought the Ulanzi filmog FM01 when it was cheap on presale. Its one of those vapour based micro fogger. Like all of them they are advertised as the all around solution for fogging everything. In reality and on a practical level this is of course greatly exagerated.
I don't have experience on other devices of that kind so, ts not that much of an educated review.
what I like
- price (although for me the current price is again in the "do I really need this" range)
I would subscribe to the newsletter and see if the price drops around 100 bucks. Ulanzi do some sales from time to time.
- you can mix your own smoke fluid. They provide the ratio vg /pg in the FAQ and a diy video wich saves a lot of money.
Seen some replacement fluid on a different site, and for the price of 50ml bottle you can generate a litre of fog fluid.
Although its a messy process: Especially working with the glycerin
- Batteries are 2 standard 18650 and are replaceable
As for quality in comparison to other devices, can't say anything since I didn't test other foggers of that kind. But I like the output...especially the low hanging fog and from the build quality standpoint I can't find any flaws.
what I don't like
Basically its all related to the vape chamber:
- price for an extra vape chamber is quite steep
- vape chamber lower lid might unscrew / leak if not screwed tightly
- The flimsy silicon piece to cover the infill hole seems like a moving target to break
- No plug to close the vape chamber for transport especially if you store it in the shipped case. Wich might result in leaking fluid.
-The Vape chamber is hidden by the plastic heat guard when in operation, wich makes it difficult so see if you are running out ot liquid during usage wich could harm the chambers coils. You can operate it without it, but then you are not able to attach the smoke modifiers wich comes with the device.
I would not recommend to use it to fill up a room with smoke (as those micro foggers all advertise), Simply by the fact that to quick shots with a regular smoke machine would have the simmilar effect (and might be more consistent between shots) than trying to filll it for several minutes with the filmog . In that case a standard fog machine is cheaper and faster to setup
From the output quality standpoint regarding the fog quality: vg/pg smoke dissipates way faster than cigarette smoke and is less whispy
So no buyers remorse from me, nice little tool to play around.
Here are two examples how I used it just for fun / testing the device.
Making of the nebula flyby
I shot a few clips with the bmpcc6k on a small table top, with a black backround, illuminated by a single light, and shot some puffs of smoke and its dissipation.
I should have taken more care avoiding folds in the fabric and illuminate only the smoke from behind
But since I do this on a weekend, I wanted to concetrate more on how the micro fogger actually behaves and test the workflow on a practical level.
I imported those clips in fusion, and selectively exported frames with had good looking smoke elements as an exr. (Around 250 elements from 5 clips)
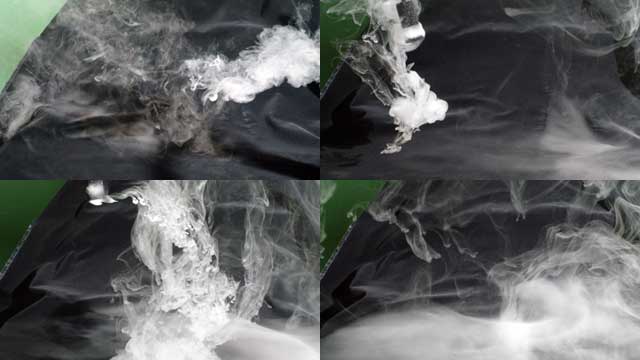
In photoshop I isolated those elements, by luminance / manual erasing, and in a new psd file I aranged 7 of these elements to my liking.
In blender I used my python port of my psil plugin for lightwave and imported the psd. (Sorry for not releasing it, but the install process is a bit more
complicated, since you have to use pip to get the needed library installed first)

I could have used the sculpting functionality to add some additional depth to the individual elements but due to my time constraints I skiped that part.
I did however lighted those elements individually with some additional point lights, to give it more spatial definition. Then I animated the camera and rendered the sequence out.
After that, I imported my WIP conversion of the old qubac model and quickly animated it, on the background.
I used after effects for the comp, since it allows me to work side by side while blender is rendering. Its not ideal, but fusion reserves gpu memory, wich can result in memory errors in cycles.
After rendering I used resolve for some color correction.
Sorry for the crappy texture and lighting of the ship, but I'm in progress to convert the old texture maps to pbr, but this will need a full day alone to get this done.
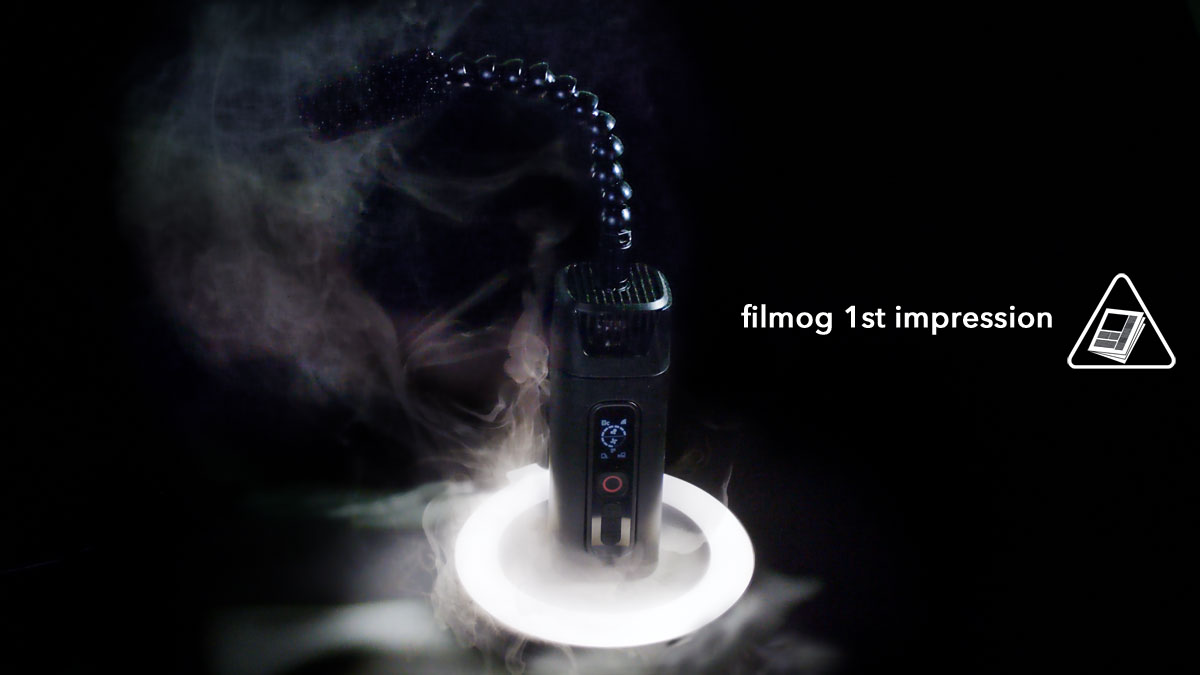
About the banner image
This was shot with the 5 bucks cheap chinese ringlight and a secondary light. The camera was also the bmpcc6k
I 3d printed and painted a small platform wich fits into the light.
(Without it the smoke would simply sunk to the ground not giving this "overflow" look.)
Then I filmed 3 passes:
One where I fill the ring light and "set" with smoke, and after some dissipation set the filmog in place.
A second pass , with the filmog still at the same position, after some smoke cleared, where I lighted the scene with a light from left.
And a third where I move the light to the right side to have some additional fill to play with.
Again I exported several frames of the first clip, and one of each of the other clips in fusion as an exr. In phoshop I blended them together (additive) removed unwated elements (hand / cable) and did some color correction, noise reduction and sharpening.
|